Multi-Camera & Multi-Display Recording
Record extra cameras and extra displays at the same time as your main recording. Each extra source is saved as its own file and angle in the project.
Questo articolo non e ancora tradotto nella tua lingua. Viene mostrata la versione inglese.
Multi-Camera & Displays records more than one camera or display in one take. Your main display and main camera record as usual. Each extra camera and each extra display you pick is recorded at the same time, as its own video file, and added to the project as its own angle.
Requirements
- ScreenKite Alpha 2.3.2 (764) or later. ScreenKite 2.3.1 and 2.3.2 do not show this feature.
- A Mac with Apple silicon.
- macOS 26 or later.
If your Mac does not meet these requirements, Multi-Camera & Displays… (Beta) does not appear in the menu.
Multi-camera recording is not used for Time Lapse recordings or for recordings with audio only.
Choose Extra Sources
- Open the Recording Hub with File → New Recording… (⌘N).
- Click the gear button (Recording Options) at the right of the Hub, then scroll to the bottom of the menu.
- Choose Multi-Camera & Displays… (Beta).
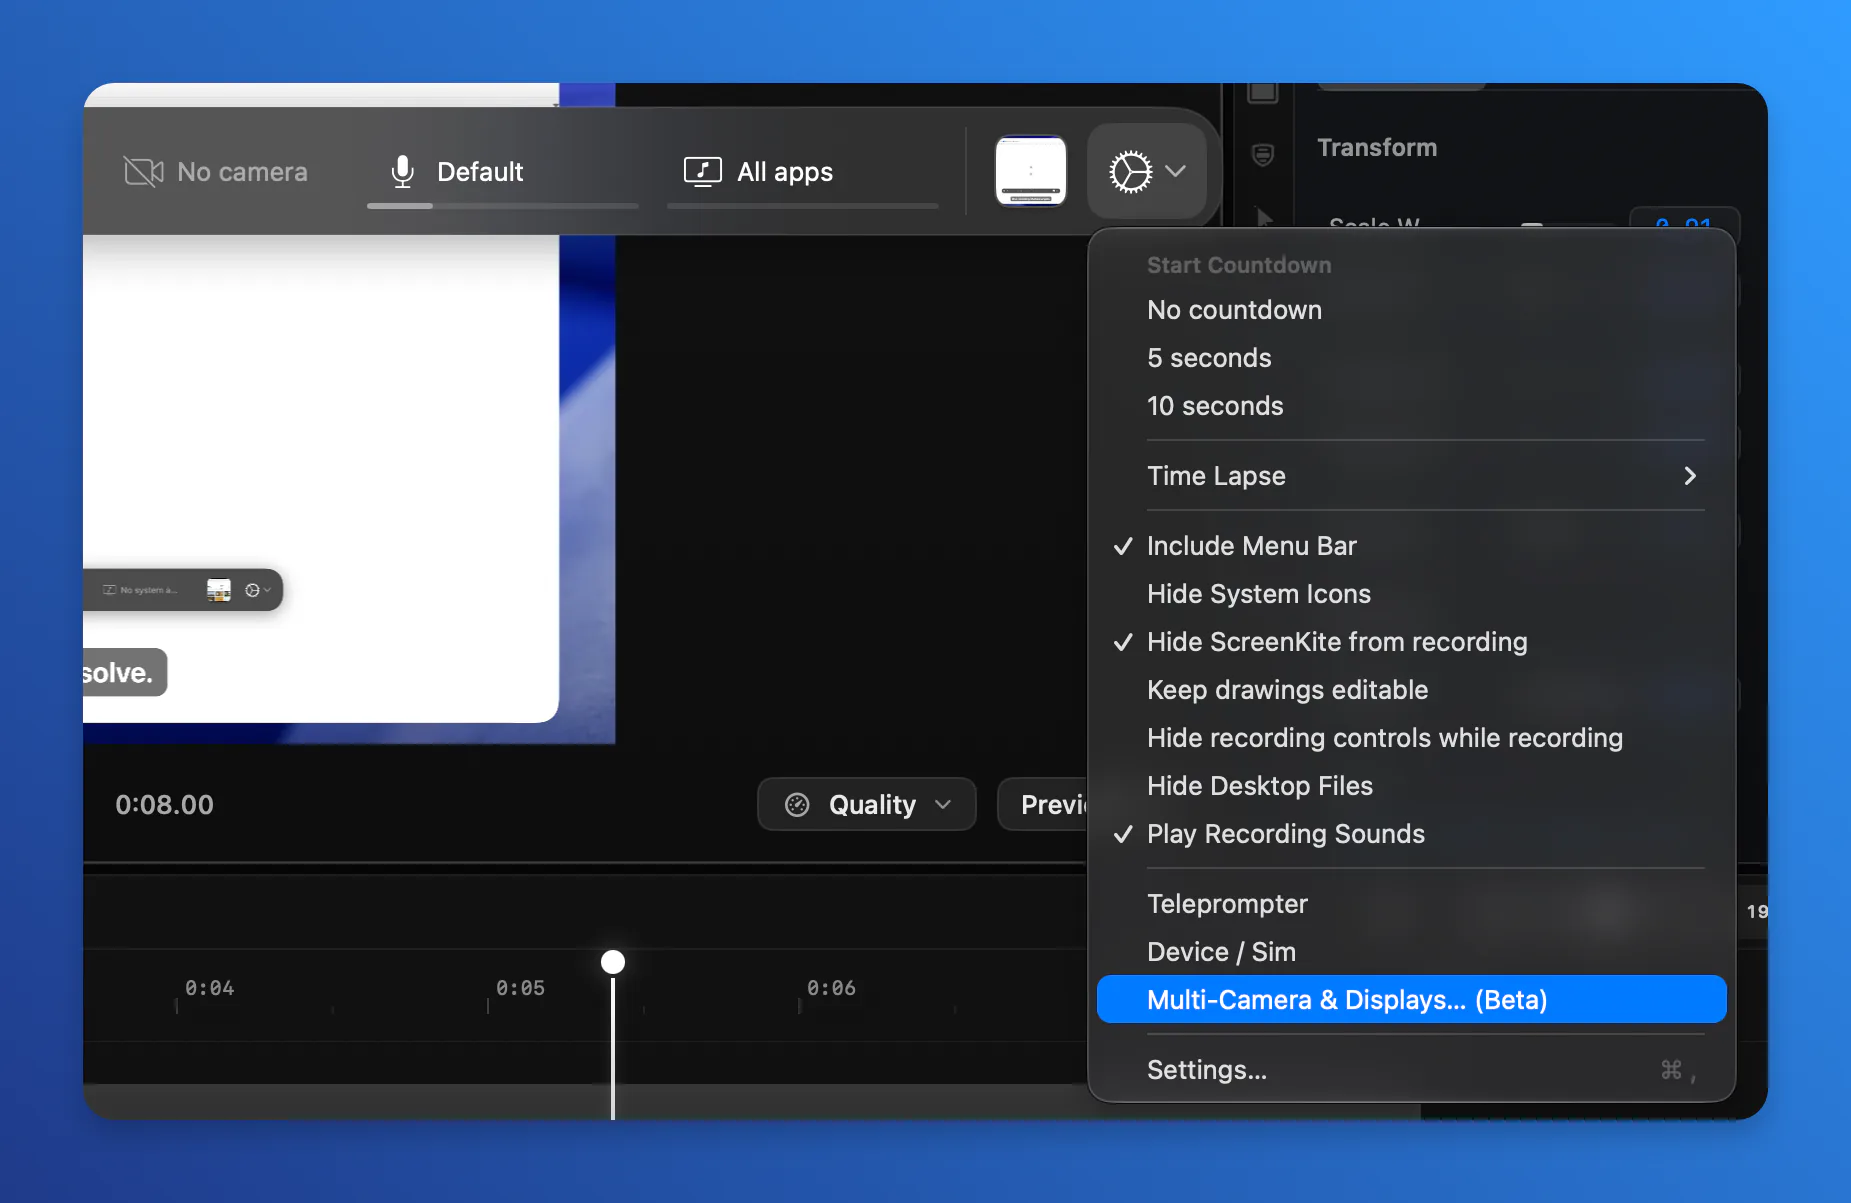
- The first time, ScreenKite shows a short notice that the feature is experimental. Click Let's Try It!. Turn on Don't show this again if you don't want to see it again.
- Turn on Record several sources at once.
- Under Cameras, check each camera you want to record as an extra source.
- Under Extra Displays, check each extra display you want to record.
- Click outside the panel to close it. ScreenKite remembers your choices.
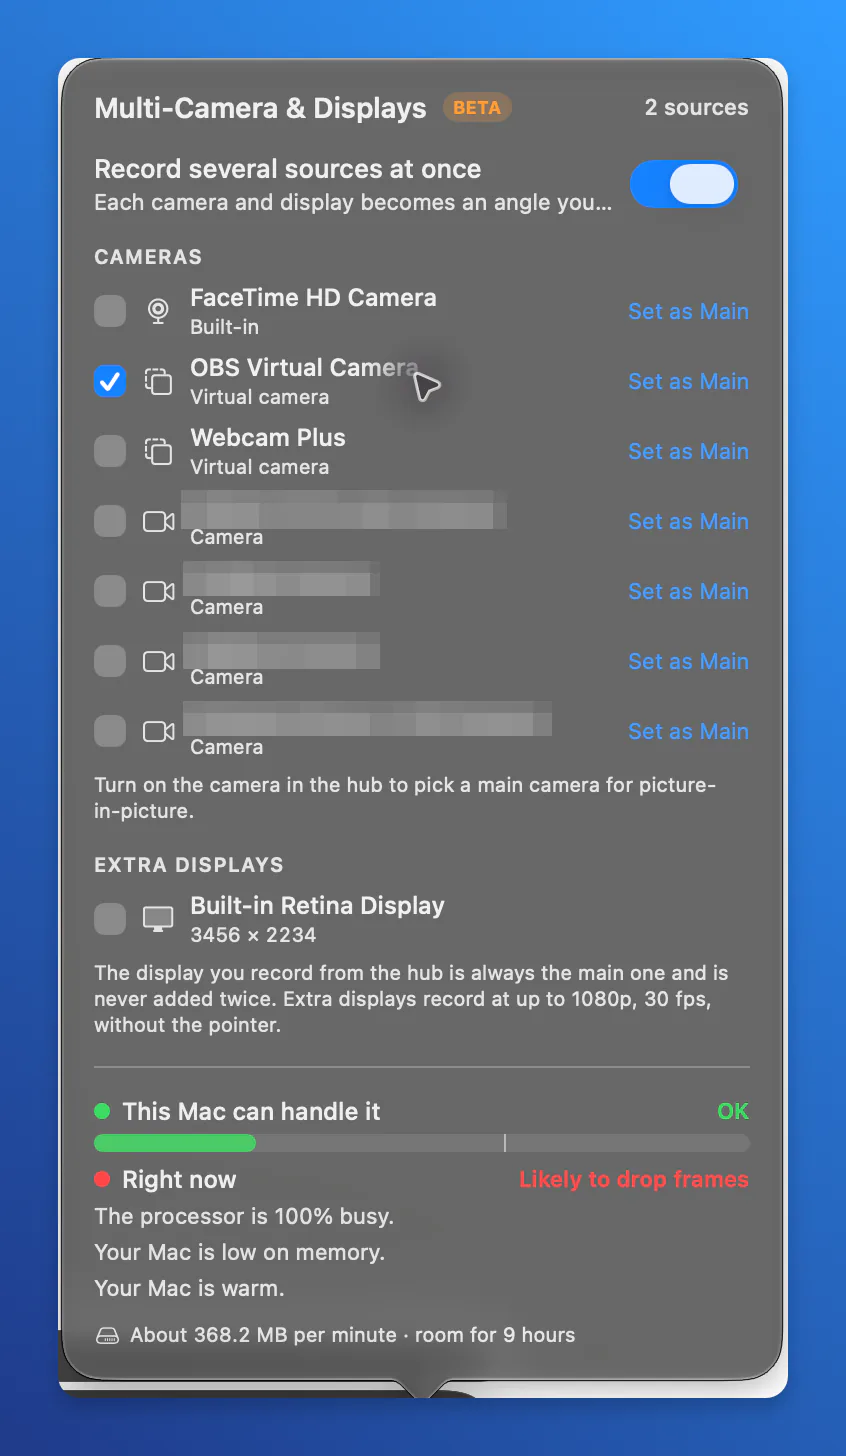
The number at the top right of the panel, such as 2 sources, counts every source in the take, including your main display.
The main camera
The camera you choose in the Recording Hub is the Main camera. It is recorded as your picture-in-picture camera, as in any recording. To make another camera the main one, click Set as Main next to it. If the camera is off in the Hub, the panel says Turn on the camera in the hub to pick a main camera for picture-in-picture.
The main display
The display you record from the Hub is always the main display, so you can't add it again as an extra display.
What Gets Recorded
| Source | Recorded as |
|---|---|
| Main display | Your usual screen recording, with the settings in the Hub |
| Main camera | Your usual camera recording |
| Each extra camera | Its own video file, up to 1280 × 720 at 30 fps, video only |
| Each extra display | Its own video file, up to 1080p at 30 fps, without the pointer and without audio |
Microphone and system audio record with the main sources as usual. Extra sources are recorded as HEVC video.
When you stop, ScreenKite adds each extra source to the project as its own file and its own angle. The main display, main camera and extra sources share one timeline, so the angles start in sync.
Check the Load Before You Record
Recording several sources at once uses a lot of your Mac's processing, memory and disk. The bottom of the panel shows two checks:
- This Mac can handle it: whether this Mac can encode all the selected sources at once.
- Right now: how busy the Mac is at the moment, for example The processor is 100% busy., Your Mac is low on memory. or Your Mac is warm.
Each check shows OK, May drop frames or Likely to drop frames. The panel also estimates the disk space the take uses per minute and how many minutes fit on the disk.
When you start a take and the Mac is short on capacity, ScreenKite asks Record N Sources? before it starts:
- Lower Extra Sources and Record records the extra cameras and displays at 15 frames per second. Your main display, main camera and audio do not change.
- Record as Selected records everything at the selected settings.
- Cancel does not start the recording.
After the Recording
The project opens in the editor as usual. The timeline shows the main recording and camera.
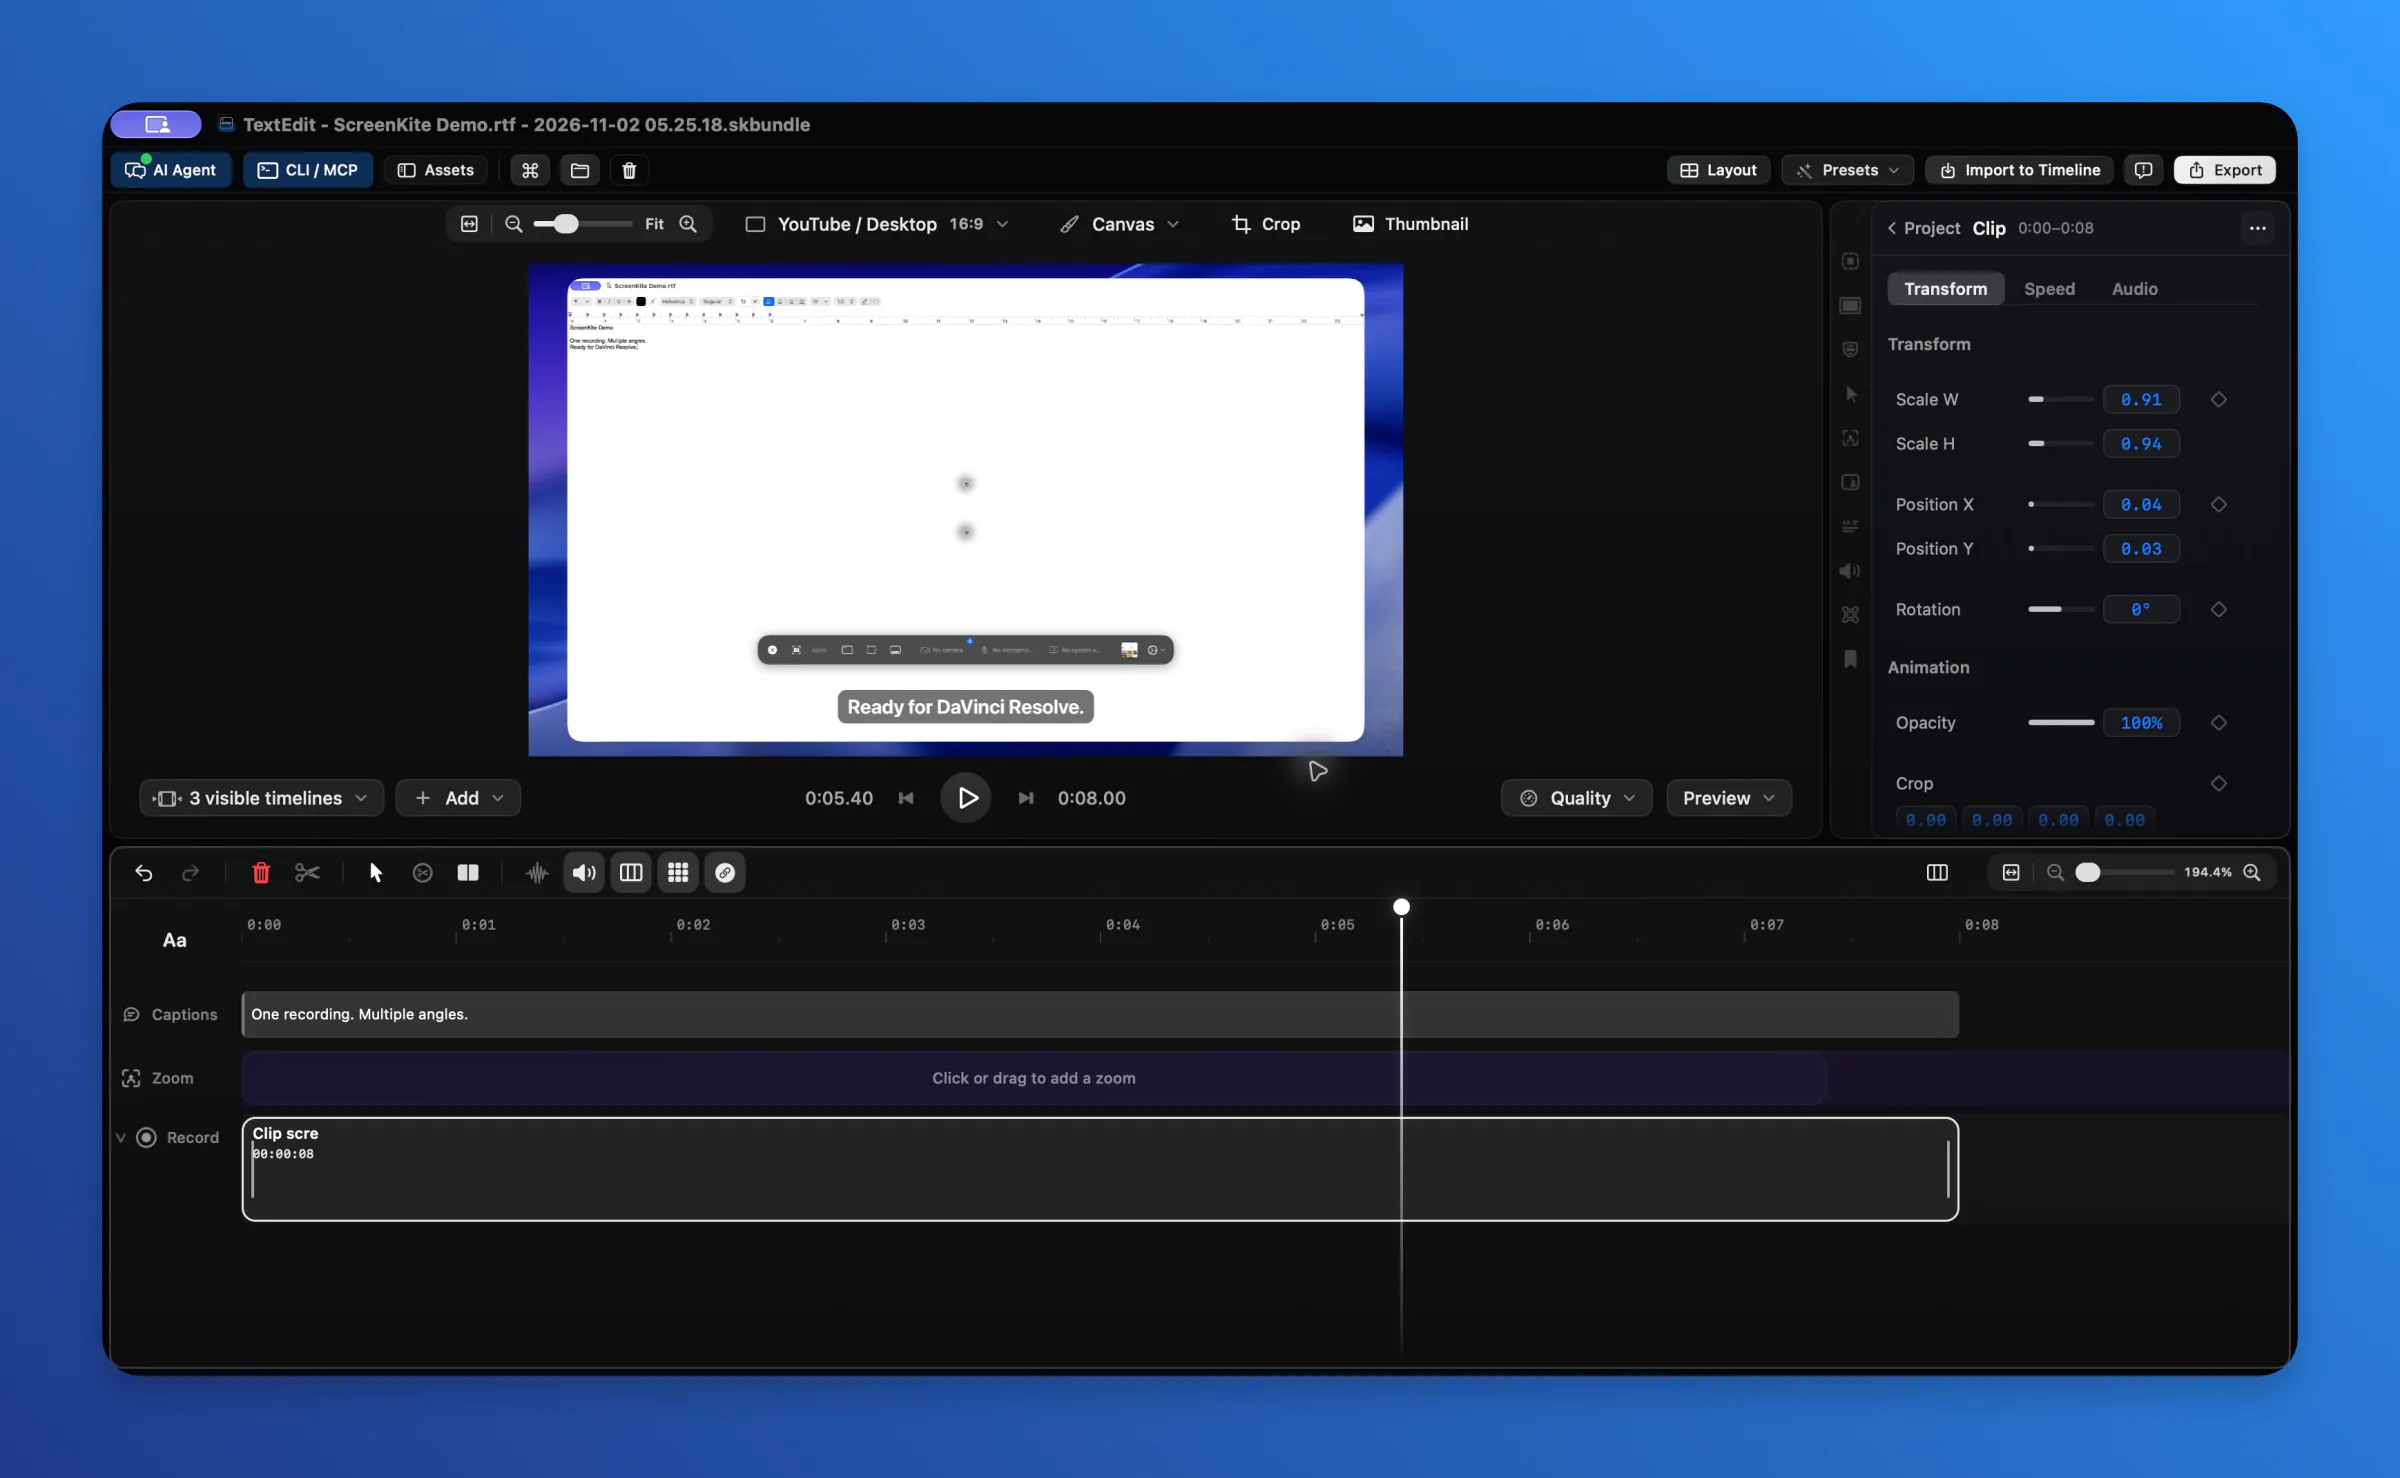
Your extra sources are saved inside the project as separate video files, one per source. To use them in another app now, Control-click the project file in Finder, choose Show Package Contents, and open the media/sources folder. Files are named by source, for example camera-2.mov or display-2.mov.
If you export the project to DaVinci Resolve, the export has the main display and main camera. Extra angles are not part of that export. See Export to DaVinci Resolve.
Limitations
- The editor has no angle-switching controls yet.
- If an extra camera or display disconnects during the take, it is not reconnected. Its angle ends where it stopped.
- ScreenKite does not lower the quality of extra sources by itself during a take. Choose Lower Extra Sources and Record before you start if your Mac is busy.
- If ScreenKite quits unexpectedly during a take, recording recovery restores the main recording. Extra sources are not part of the recovered project.
- Low disk space shows a warning but does not stop you from starting a take.
Troubleshooting
I don't see Multi-Camera & Displays… (Beta)
Check that you use ScreenKite Alpha 2.3.2 (764) or later, on a Mac with Apple silicon and macOS 26 or later. Then open the Hub again and scroll to the bottom of the Recording Options menu.
A camera is missing from the list
Connect the camera before you open the panel, and check that ScreenKite has Camera permission. If the panel says No camera is connected., see Setting Up Permissions.
"Your Mac Is Busy" shows during the recording
ScreenKite checks the Mac every few seconds during the take. When the load is high, it shows Your Mac Is Busy with the reason. Extra cameras and displays may drop frames, but your main display and audio keep recording. For the next take, record fewer extra sources, quit other apps, plug in your Mac, or choose Lower Extra Sources and Record.
"Camera Stopped" or a display stopped during the recording
When an extra source stops, ScreenKite shows its name with Stopped. The rest of the recording continues. That source's angle ends where it stopped. Reconnect the device and start a new take if you need the full angle.
The recording uses a lot of disk space
Each extra source is a separate video file. Check the per-minute estimate at the bottom of the panel before a long take, and free up space if room for shows fewer minutes than you need.
FAQ
Can I switch between angles in the editor?
Not yet. Each source is recorded as its own file and angle, and angle switching in the editor is coming in a later update. Until then, the project plays and exports the main display and main camera.
Do extra cameras record sound?
No. Extra cameras record video only. Record your voice with the microphone in the Hub.
Is there a limit on how many sources I can add?
ScreenKite does not set a fixed number. The load check in the panel tells you whether your Mac can handle the sources you selected.
Does it work on an Intel Mac?
No. Multi-camera recording needs a Mac with Apple silicon and macOS 26 or later.